Sunday, May 30, 2010

Chocolate Strawberry Mousse Cake

Three layers of flour-less chocolate cake, strawberry chocolate mousse,
topped in chocolate ganache AND strawberries.
Decadent does not even begin to describe this dessert.
This piece of heaven comes from Marcel Desaulniers, the author of
Death By Chocolate.
In his cookbook are desserts with names like, Chocolate Phantasmagoria,
Double Mocha Madness, and his signature dessert - Death By Chocolate.
This man LOVES his chocolate.
I find myself perusing this particular cookbook when I am in
the mood to make something that will overload your senses.
When I feel like creating a few minutes of euphoria that
will have you savoring the moment.
I also need a crowd.
Regrettably, this dessert has a relatively short shelf life,
and should be eaten within 24 hours of making it.
Without any further adieu...the recipe.


Chocolate Strawberry Mousse Cake:
Chocolate Cake:
1/2 lb. butter (2 T. melted)
8 oz. semisweet chocolate
8 egg yolks
3/4 c. sugar
4 egg whites
Chocolate Strawberry Mousse:
2 pints strawberries, stems removed
16 oz. semisweet chocolate
4 oz. white chocolate
6 egg whites
2 T. sugar
1 c. heavy whipping cream
Semisweet Chocolate Ganache:
1 c. heavy whipping cream
2 T. butter
2 T. sugar
12 oz. semisweet chocolate
Lightly coat the insides of 3 - 9x1.5 inch cake pans with melted butter. Line each pan with parchment paper, then lightly coat the parchment paper with more melted butter. Set aside.
Preheat oven to 325 degrees.
Heat 1 inch of water in the bottom half of a double boiler over medium heat. Place remaining butter and 8 oz. semisweet chocolate in the top half of the double boiler. Tightly cover the top with plastic wrap. Allow to heat for 10-12 minutes. Remove from heat, stir until smooth, and hold at room temperature.
Place the egg yolks and 3/4 c. sugar in the bowl of an electric mixer fitted with the paddle. Beat on high until slightly thickened and lemon colored, about 4 minutes. Scrape down the sides of the bowl and beat on high for 2 additional minutes.
While the egg yolks are beating, whisk 4 egg whites in a large stainless steal bowl until stiff but not dry.
Using a rubber spatula, fold the melted chocolate mixture into the beaten egg yolk mixture. Add a quarter of the beaten egg whites and stir to incorporate, then gently fold in the remaining egg whites.
Divide the batter between the prepared pans, spreading evenly, and bake in the preheated oven until a toothpick inserted in the center comes out clean, about 25-30 minutes. Remove the cakes from the oven and allow to cool in the pans for 15 minutes. (During the baking process, the surface of the cakes will for a crust; this crust will normally collapse when the cakes are removed from the oven.) Invert 1 of the cakes on to the bottom of a 9 inch springform pan. Invert the other 2 cakes onto cake circles. Remove parchment paper and refrigerate cakes for 30 minutes.
To prepare the chocolate mousse, reserve the 12 best looking strawberries to decorate the top of the cake. In a food processor fitted with a metal blade, puree 4 oz. of strawberries (12 medium sized berries should yield 1/2 c. - 4 oz. - of puree.) Set aside until needed. Refrigerate remaining berries until needed (that includes the 12 berries for decoration.)
Heat 1 inch of water in the bottom of a double boiler over medium heat. Place 16 oz. of semisweet chocolate, the white chocolate and the strawberry puree in the top half of the double boiler. Tightly cover with plastic wrap. Allow to heat for 12-14 minutes. Remove from the heat and stir until smooth. Transfer to a stainless steel bowl, using a rubber spatula to remove all of the melted chocolate mixture. Keep at room temperature until needed.
In the bowl of an electric mixer fitted with a balloon whip, whisk the 6 egg whites on high until stiff peaks form, about 2 minutes. Continue to whisk on high while gradually adding 2 T. sugar. Whisk until stiff but not dry. Set aside until needed.
Using a hand held mixer, whip the heavy cream in a well-chilled stainless steel bowl until stiff. Fold a quarter of the egg whites into the melted chocolate mixture, then fold in the whipped cream. Now fold in the remaining egg whites. Set aside at room temperature until needed.
Assemble the 9 inch springform pan. Spread 1/2 c. of the mousse onto the cake layer in the assembled springform pan. Arrange 1/2 the amount of reserved strawberries (not including the 12 reserved for decoration), stem side down, into the mousse. The berries should be arranged in 2 rings: the first ring being 3/4 of an inch from the outside edge of the cake and the second, inside ring 3/4 of an inch away from the first. Distribute 3 c. of the mousse over the berries, being careful to keep the berries in position. Holding the pan by the top rim, gently but firmly tap the bottom of the pan2 to 3 times on your work surface to eliminate air pockets. Position a cake layer on top of the mousse, then repeat the process used on the first layer. Top the mousse with the remaining cake layer and gently press into position. Refrigerate the cake for 2-3 hours (do not freeze.)
Make Semisweet Chocolate Ganache by heating the heavy cream, butter and sugar in a heavy saucepan over medium-high heat. When hot, stir to dissolve the sugar. Bring the mixture to a boil. Place the chocolate in a stainless steel bowl. Pour the boiling cream over the chocolate and allow to stand for 5 minutes. Stir until smooth. Allow to cool to room temperature.
Reserve 3/4 c. of Chocolate Ganache for decorating the top of the cake. Set aside.
Remove the sides of the springform pan (do not remove the bottom of the pan; this will make it easier to handle later). Use a cake spatula to smooth and fill in the sides of the cake with 2-3 T. of room temperature ganache. Evenly spread the remaining amount of this ganache over the top and sides of the cake. Refrigerate the cake for 1 hour.
Transfer the reserved ganache to a pastry bag fitted with a large star tip. Remove the cake from the refrigerator. Pipe a circle of 12 evenly spaced stars along the outside edge of the top of the cake. Place a strawberry, stem side down, into each ganache star. Refrigerate the cake for 30 minutes.
Cut the cake with an electric serrated knife, heating the blade of the slicer under hot running water before making each slice. Allow the slices to come to room temperature for 20-30 minutes before serving.
Bon Appetit!

Chef's Note: Give your chocolate ganache plenty of time to cool before you attempt to ice the cake. The longer it sits the thicker it will become - you don't want to try to ice the cake if the ganache is too warm or thin.
The berries I used were rather large - to do it over again, I would cut them in half to make the layers more even. It didn't affect the taste, but I ran out of room in the springform pan.

Friday, May 28, 2010

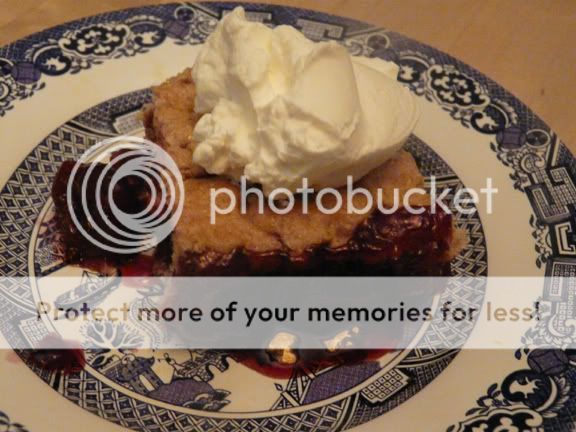
Cherry Cobbler

I really love Cherry Cobbler and this recipe by Emeril Lagasse is my favorite. I make it with any fruit that happens to be in season, or in this case, I raided my food storage for the Bing cherries I canned last summer. I didn't need any additional sugar since the cherries are canned in a sweet syrup. Use the amount of sugar in the filling to taste depending on what fruit is used. Peaches wouldn't require the same amount of sugar as tart cherries.


Filling:

6 cups tart red cherries, pitted
1 1/4 cups sugar
1/4 cup water
4 teaspoons cornstarch

Topping:

1 cup flour 1/4 cup sugar 2 T brown sugar 1 tsp baking powder 1/2 tsp cinnamon 3 T butter 1 egg, beaten 3 T milk

Preheat oven to 400 degrees. In a saucepan combine filling ingredients and cook, stirring until bubbling and thickened. Pour into an 8-inch square baking dish. Meanwhile, stir together flour, sugars, baking powder, and cinnamon. Cut in butter until it is crumbly. Mix together egg and milk. Add to flour mixture and stir with a fork just until combined. Drop topping by tablespoonfuls onto filling. Bake for 25 minutes until browned and bubbly.

Mmmm Macaroni and Cheese

Okay so I just went to the dentist and half of a complicated root canal done. It hurts too much to think about eating so I figured the next best thing is to write about food-(but much less fun)! I really love homemade macaroni and cheese. Most of the time I make a cheese sauce and it is a bit more time consuming standing by the stove and stirring. The most effort here is boiling the water ( :


When your pot of water is boiling, add 1 3/4 C macaroni. While the noodles are cooking, mix together the following ingredients:

12 oz cottage cheese
1 C sour cream
1/4 C parmesan cheese
2 C shredded cheddar
1/2 tsp garlic salt
salt and pepper to taste

Drain the macaroni and mix together. Pour into a 9X13 pan. I like to sprinkle breadcrumbs on top. Use around a cup of breadcrumbs mixed with a tablespoon or so of melted butter. Bake at 350 degrees for about 30 minutes. Bon Appetit!

Monday, May 24, 2010

Peppered Bacon and Tomato Linguine

This one is a crowd pleaser! It couldn't be easier and really...Who doesn't like bacon? I found it on Allrecipes and have made it so many times since. All 3 of my kids love it and that is virtually unheard of. I didn't have any linguine, so I used spaghetti.


Peppered Bacon and Tomato Linguine:

1 lb bacon, diced
2 green onions, chopped
2 t. minced garlic
1 - 14.5 oz can diced tomatoes
1 T. fresh basil, julienned or 1 t. dried basil
1 t. salt
ground pepper to taste
1 lb linguine
Parmesan cheese

Place bacon in a large deep skillet. Cook over medium heat until crisped. Drain, reserving drippings and set aside.

Saute green onions and garlic in the same pan used to cook bacon over medium heat for 1 minute. Stir in tomatoes, basil, salt and pepper, simmer for 5 minutes.

Meanwhile in a large pot of slightly salted water, cook pasta. Add pasta and cook according to direction. Drain.

Toss hot pasta with tomato sauce, add bacon right before serving, giving it one last toss. Sprinkle with parmesan cheese.

Bon Appetit!

Billie's Italian Cream Cake

I don't know who Billie is, but she makes one heck of a cake! I found this recipe on The Pioneer Woman website and knew I had to try it. Curiously, I found the cake was even better the next day - almost like a marriage had taken place.


Billie's Italian Cream Cake:

Cake:

1/2 c. butter, softened
1 c. vegetable oil
1 c. sugar
5 eggs, separated
3 t. vanilla
1 c. coconut
2 c. flour
1 t. baking soda
1 t. baking powder
1 c. buttermilk

Frosting:

2 - 8 oz pkgs cream cheese, softened
1/2 c. butter, softened
3 t. vanilla
2 lb. powdered sugar
1 c. walnuts, chopped
1 c. coconut

Preheat oven to 350 degrees. Grease 3 - 9 inch cake pans, set aside.
Beat egg whites until stiff, set aside.

In a large bowl combine butter, oil and sugar, beat until fluffy. Mix in egg yolks, vanilla and coconut. Add dry ingredients and finally add buttermilk. Gently fold in egg whites.

To make frosting, combine cream cheese and butter - mix well in Kitchen Aid bowl. Add, vanilla, then powdered sugar. Once well blended add nuts and coconut.

Evenly pour cake batter into the 3 prepared cake pans, sprinkle with 2 T. sugar. Place cake pans in preheated oven for 20-25 minutes or until toothpick inserted in the middle comes out clean. Remove from oven, cool in pans for 15 minutes then turn cakes out on a wire rack. These cakes are rather delicate, so be careful not to break them. Cool completely.

Once cooled frost between layers.

Bon Appetit!

Sunday, May 23, 2010

Pineapple Cheeseball

This is my friend Maria's recipe and I have made it countless times. I love the sweet and savory combination--so good!


1 8oz pkg of cream cheese, softened
1/2 cup of crushed pineapple (drain and squeezed really well to get rid of any moisture)
1/8 cup chopped green pepper
1 tsp finely chopped onion
1/2 tsp Lawry's Seasoned Salt

Mix it all together. It tastes better if it sets overnight, so I don't form it into a ball yet; just scrape it into a container and put it in the fridge. I used to roll it and then put it in the fridge overnight, but my Dad was right, it really does roll with very little mess if you wait until the next day to roll. The original recipe calls for it to be rolled in 1 C of chopped pecans but since my daughter has an allergy, I just use graham cracker crumbs. Serve with crackers.

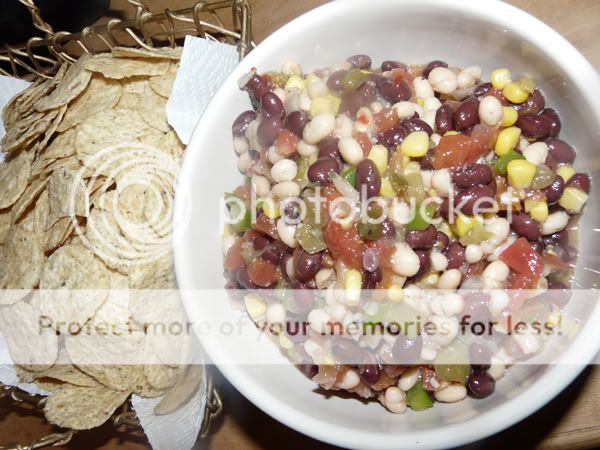
Yummy Bean Salsa

We don't eat a lot of meat, so we really enjoy this salsa with lots of beans for protein. It is best if you can leave it overnight so there is a good marriage of the flavors. You can add your favorite beans and adjust the quantity of corn or amount or type of bell peppers.


1 1/2 C black beans, rinsed and drained
1 1/2 C white beans, rinsed and drained
1 C corn kernels (frozen or canned)
1/3 C chopped green pepper
1 4oz can of green chilies
1/3 C chopped onion
1 14.5 oz can of petite diced tomatoes, drained
3/4 C Italian salad dressing
1/2 tsp garlic salt
I like to add a few chopped green onions too

Mix all together; cover and refrigerate overnight. Before serving you may need to drain off some excess liquid. Also good with chopped cilantro- (but add just before serving). Serve with tortilla chips.


Saucy Meatballs

Now I am finally back from my amazing holiday, I am finally getting around to putting a few new recipes that I have made in the last few days. This meatball sauce is a super fast recipe that can-- (in my case this week), go over pre-bought frozen meatballs, or on your own homemade meatballs. This amount made just the right amount for our small family, but it can easily be doubled.


1 Cup of jellied cranberry sauce
3/4 C of Heinz Chili sauce
1 T brown sugar
1 1/2 tsp lemon juice

Stir together and simmer over low heat until the cranberry sauce is fairly smooth. Since I used pre-cooked meatballs, I just baked them for a few minutes before simmering them in the sauce for around 15 minutes. This is also a great recipe for the slow cooker.

Saturday, May 22, 2010

Restaurant Style Salsa

I was browsing Ree Drummond's website - The Pioneer Woman Cooks,
and found this recipe. Coming from Utah, we have lots and lots
of Mexican restaurants and I have enjoyed on many
occasions this type of salsa.
Since my salsa garden is not ready to yield what I will need for fresh salsa this
seemed like a fantastic alternative today.
I followed her recipe exactly, then added a bit more lime juice at the end.
It's well worth passing along to you!

The PW's Restaurant Style Salsa:

1 can (28 oz) whole tomatoes with juice

2 cans Rotel (tomatoes with green chilies)

1/4 c. onion

1 glove garlic

1 whole jalapeno

1/4 t. salt

1/4 t. sugar

1/4 t. cumin

1/2 c. cilantro (more or less to taste)

1/2 whole lime, juiced

In the large bowl of a food processor combine all ingredients and pulse until it reaches the consistency you like.

Refrigerate for a couple of hours to let the flavors marry - serve with chips or even better...nachos!

Bon Appetit!

Raspberry Cream Muffins

Summer is on it's way - nothing says warm weather like berries.
This recipe has everything that makes a muffin superb...raspberries,
sour cream and cream cheese. It's almost a dessert!

Raspberry Cream Muffins:

4 eggs
2 c. white sugar
1 c. vegetable oil
1 t. vanilla extract
1 t. almond extract
4 c. flour
1 t. salt
1 t. baking soda
2 c. sour cream
2 c. raspberries - or any berry that suits you
5 oz. cream cheese
white sugar for sprinkling

Preheat oven to 400 degrees. Grease muffin tins or line with paper muffin liners.

In a large bowl beat eggs, gradually add sugar while beating. Continue beating while slowly pouring in the oil. Stir in vanilla, almond extract and sour cream. Add salt and baking soda and flour.

Gently fold in raspberries. Scoop batter into prepared muffin tins. Using a teaspoon, place about a teaspoon of cream cheese onto the tops of each muffin then sprinkle with sugar.

Bake in preheated oven for 20 minutes or until a toothpick inserted in the center comes out clean.

Bon Appetit!

Friday, May 21, 2010

Baking with Julia

I wanted to share my
favorite, number one, best of all time, greatest
cookbook ever published, in my humble opinion.
From the picture, you can see that this cookbook has been well used, it's my go to book.
It was published in 1996 and I actually found and made my wedding cake from this book!
I used to watch Julia Child's baking show on PBS and she
inspired me to tackle the more "difficult" pastries.
This book includes every baked item I've ever looked for and
even more that I've never heard of.
Julia Child is inspirational to me.

Wednesday, May 19, 2010

Cinnamon Rolls

I've been known to make a few cinnamon rolls on occasion.
I've tried so many different recipes - and feel like I've found the best one out there.
My family prefers them without nuts or raisins, but feel free to add them.
****************
Roll your dough out - it's not a science - into a rectangle
Spread with softened butter, not margarine.

Sprinkle with brown sugar (I add a small sprinkling of white sugar too)

Sprinkle generously with cinnamon

Roll up the dough

Slice into 1 inch pieces, using a sharp knife makes this part much easier

Let them rise in a warm location until doubled in size

Bake until golden

Frost with your favorite frosting or make your own

Eat them!
Best Ever Cinnamon Rolls: (makes approx. 2 dozen)
1/2 c. warm water
2 T. yeast
2 c. milk
1/2 c. butter
1/2 c. sugar + 2 T. for proofing
1 1/2 t. salt
3 eggs
6 cups flour (may take up to 1/2 c. more)
1 c. butter, softened
1 1/2 c. brown sugar (I've never measured, but I make sure all of the dough is covered)
1/2 c. white sugar
Cinnamon - enough to sprinkle generously, maybe 3-4 T.?
Nuts or raisins (optional)
In the large bowl of your Kitchen Aid, mix the water, yeast and 2 T. sugar. While the yeast is proofing, combine the milk, butter, 1/2 c. sugar and salt in a small saucepan. Over low heat, melt the butter, stirring occasionally.
In a small bowl, beat the eggs and temper with the warm milk & butter mixture. Careful not to scramble the eggs - so do it slowly.
Once eggs are tempered and yeast is proofed, add the milk/butter/egg mixture to the yeast. Adding one cup at a time, incorporate the flour. DOUGH WILL BE STICKY. Cover and let it rise until doubled.
Once risen, turn dough out onto a heavily floured surface - roll dough into a rectangle keeping the dough about 1/3 of an inch thick.
Spread softened butter over the surface of the dough. I find the back of a large spoon works really well -
Sprinkle with brown and white sugars, then sprinkle with cinnamon.
Begin rolling up the dough from the long side. Once rolled, let it sit seam side down while you prep your pans.
Grease 2 large pans, mine are 11x15 inch pans and each one fits 12 rolls nicely. You may need additional pans depending on the sizes. You don't want to smash them in or they will have nowhere to rise:(
Cut the long roll into 1 inch pieces and place in the greased pans. Cover with plastic wrap and let rise in a warm place.
Once doubled in size and touching each other, place in the oven, preheated to 350 degrees for 20-25 minutes or until golden brown.
Once cooled, frost with the frosting of your choice. I usually make my own cream cheese frosting.
Bon Appetit!

Sunday, May 16, 2010

Enchilada Lasagna

Mexican style food.
Mmmm, Mmmm, Mmm, Mmm, Mmm.
When we get together as a family we always have "Mexican Night."
It always consists of far too much food,
and most certainly includes tacos and enchiladas.
When my Dad was here in February we found
a quaint (to say the least) authentic
Mexican restaurant/grocery store.
We went multiple times while he was here and he made
me promise I would go even after he left. I've been a few times,
but it's not quite the same as when he went with me.
*******************
I found this recipe in the latest "Taste of Home" magazine and decided to try it.
I changed a few things, which I will note - but nothing that really changed the idea of the recipe.

Enchilada Lasagna:

1 lb. ground beef
1 medium onion, chopped
2 garlic cloves, minced
1 can refried beans
(the recipe called for a can of tomatoes, but I didn't have one so I substituted the beans)
1 can (10 oz) enchilada sauce, or a package prepared
2 t. ground cumin
1 egg, beaten
1 - 16 oz. container cottage cheese
3 cups shredded Mexican blend cheese
10 (8 in) flour tortillas, cut in half
1 c. shredded cheddar cheese

In a large skillet, cook the beef, onion and garlic over medium heat until meat is no longer pink; drain if necessary. Stir in the beans (or tomatoes if you prefer), enchilada sauce and cumin. Bring to a boil. Reduce heat and simmer for 20 minutes.

In a small bowl combine the beaten egg and cottage cheese. Set aside.

Place 1/3 of the meat mixture in the bottom of the 9x13 inch pan that has been sprayed with cooking spray, proceed to layer 1/2 of the tortilla's on top of meat, then the cheese mixture. Next, more meat & tortillas. Finish it off with meat on top.
Sprinkle with cheddar cheese.

Cover and bake at 350 degrees for 30 minutes. Uncover and bake for 10 minutes longer or until bubbly. Let stand for 15 minutes before cutting.

Serve with shredded lettuce, tomatoes, guacamole, sour cream, onions and cilantro.

Bon Appetit!

Chera's Sour Cream Belgian Waffles

I wasn't always a fan of waffles...Belgian or otherwise,
but this recipe from my sister changed everything.
Light and fluffy - yet filling, these can be topped with
anything your heart desires. Jaina and I prefer berries,
while the boys and James like syrup and whipped cream.
*******************
This recipe can be made the night before and stored
in the fridge for 3 days.


Chera's Sour Cream Belgian Waffles: (makes 10 waffles)

2 eggs, separated
2 c. sour cream
1 c. milk
6 T. butter, melted
2 c. flour
4 t. sugar
1 t. salt
1/2 t. baking soda
2 t. baking powder

Beat 2 egg whites until stiff peaks form, set aside.

Mix all wet ingredients in the large bowl of Kitchen Aid. When combined, add all dry ingredients. Fold in stiff egg whites, gently until combined.

Pour into lightly sprayed waffle iron. Enjoy with berries and whipping cream.

Bon Appetit!

Friday, May 14, 2010

Raspberry Cream Breakfast Braid

I love-love-love pastries.

I love creating them, making them and eating them.

This one is a culmination of a couple different recipes.

I used the "Amish Bread" recipe for the bread portion and took

the filling from another recipe "Braided Lemon Bread."

I used raspberry jam instead of lemon curd since that's

what I had on hand. I'll include the lemon curd recipe if you'd like

to give it a whirl.


Raspberry Cream Breakfast Braid:


1/2 recipe Amish White Bread recipe for 1 braid, or a full recipe for 2 braids

Amish White Bread: ***these proportions are for the full recipe***

2 c. warm water

1/3 c. sugar

1 1/2 T. yeast

1 1/2 t. salt

1/4 c. vegetable oil

5 1/2 c. flour


Filling: (enough for 1 braid)

4 oz. cream cheese, softened

3 T. sugar

2 T. sour cream

2 T. flour

2 t. lemon juice

1/2 c. raspberry jam or lemon curd

Combine all ingredients except for the jam/curd, in a small bowl, set aside.

Lemon Curd: (enough for 1 braid)

3 T. fresh lemon juice
3/4 t. lemon zest, finely chopped
3 T. sugar
1 large egg
2 T. butter, cut in small pieces

Whisk together lemon juice, zest, sugar and egg in a medium saucepan. Add butter and cook over moderately low heat, whisking often, until curd is thick enough to hold whisk marks and first bubbles appear on the surface - about 5 minutes. Transfer the curd to a bowl and chill, it's surface covered with plastic wrap until cold about 1 hour. Makes just slightly less than 1/2 cup.


************************

For the dough, using a Kitchen Aid mixer fitted with the dough hook, combine the warm water, sugar and yeast - stir to dissolve. After the yeast has proofed and become creamy looking add the oil and salt. One cup at a time, incorporate the flour until your dough comes together, with a little stickiness. You can always add more flour if the dough proves difficult to handle after the first rising.

Cover the bowl with plastic wrap and set in a warm place. Let the dough rise until doubled.

Once doubled, punch the dough down and turn the dough out onto a greased cookie sheet. Using a rolling pin create a rectangle, rolling the dough to somewhere between 1/4 inch - 1/2 inch thick. By looking at the dough, divide your rectangle into thirds and spread the filling mixture down the middle third of your rectangle. Spread the jam or lemon curd on top of the cream cheese filling. To form the braid, cut crosswise strips 1 inch apart down the outer length of your dough, careful not to cut into the middle with the filling.

To begin "braiding" begin by folding the top flap and bottom flap over the filling. Lift the top dough strip diagonally across filling and repeat with the other side, continuing all the way down the dough until you get to the end. At this point tuck to last strip decoratively under the braid.

I like to used melted butter to brush over the braid, but you may use an egg wash if you prefer.

Cover loosely with plastic wrap and set in a warm place to rise until quite puffy, about 45 minutes depending on how warm your "warm spot" is.

Bake at 375 for 25-30 minutes. Let it set for 15-20 minutes, and serve warm. You may also drizzle with frosting or sprinkle with coarse sugar if you like.

Bon Appetit!

Wednesday, May 12, 2010

Penne with Cauliflower, Tomatoes & Cream

This pasta dish is an all-time favorite in our family.
Even my brother who doesn't like cauliflower OR tomatoes requests it.
Creamy, rich and even great the next day...if there is any left.

Penne Al Cavolfiore E Panna (Cauliflower Penne Pasta, as we call it):

3/4 lb cauliflower, cut into florets
4 T. butter
1/3 c. onion, chopped
1/4 t. red pepper flakes
salt
1 lb. fresh roma tomatoes, peeled and diced
3/4 c. heavy cream
1/2 c. parmesan cheese, grated

Cook cauliflower in unsalted water until just tender. When cool, cut into bite sized pieces.
Melt butter in a large saucepan over medium heat. Add onion and cook until it has softened and turned a rich golden color.
Add red pepper flakes and cauliflower - season generously with salt. Saute until cauliflower is lightly browned: 8-10 mins. Stir in tomatoes. Remove mixture from heat and add cream. Cook until slightly thickened.
In a stock pot cook pasta until al dente. Drain it and toss with sauce and parmesan cheese. Taste for salt and serve at once.

***Chef's Note: When I make this I always double the sauce. It is great the next day and I don't like dry pasta. I also use half & half for part of the cream. If you do have leftovers, store pasta in a separate container and then toss it with the sauce the next day.

Tuesday, May 4, 2010

White Bread

Making bread brings me joy.
Baking in general brings me joy, but bread making is among
my favorite past times.
This recipe is thanks to Allrecipes, a website I love.
It is the perfect sandwich bread, super soft and dense.
After lots of trial and error along with plenty of research, I can also
tell you have to keep it fresh longer.
Once the loaves are cooled...slice them and freeze them.
Then you have but to take out as many pieces as you want and VOILA,
the slices come out wonderfully soft and fresh!
*************************
Perfect crust - perfect middle.
Sandwiches never tasted so good!
Amish White Bread:
2 cups warm water
1/3 c. sugar
1 1/2 T. active dry yeast
1 1/2 t. salt
1/4 c. vegetable oil
5 1/2 c. white flour
In a large bowl, dissolve the sugar in warm water, then stir in yeast. Allow to proof until yeast resembles a creamy foam - about 10 minutes.
Mix salt and oil into the yeast. Mix in flour one cup at a time. Knead dough on a lightly floured surface until smooth, or let your Kitchen Aid do all the work with the dough hook.
Cover the bowl with plastic wrap and let it rise for 1 hour or until doubled in bulk.
Punch dough down. Knead for a few minutes and divide in half. Shape into loaves and place into two well oiled 9x5 inch loaf pans. Allow to rise again until the dough has risen 1 inch above the pans.
Bake at 350 degrees for 30 minutes.
P.S. I still haven't figured out what makes this "Amish" and quite frankly I was a little leary upon first seeing the recipe. Once I found out that it didn't start in a bag and require weeks of babysitting and lots of forgiving neighbors, I decided it was worth trying. Glad I did!
Bon Appetit!

Ina's Perfect Apple Crisp

This is my first choice when faced with the dilemma...
TOO MANY APPLES & NO ONE IS EATING THEM.
I haven't found it really matters what kind of apple you use. I've used Granny Smith's, Braeburn, Gala, Fugi and Golden Delicious - all with tasty results.
Today however we had an abundance of Braeburn & Gala apples.
This particular recipe has the perfect blend of spices and citrus juice, from your friend and mine...Ina Garten.


Ina's Perfect Apple Crisp:

3 lbs. apples, peeled & sliced
2 T. orange juice
2 T. lemon juice
1/2 c. sugar
2 t. cinnamon
1 t. nutmeg
*******

Topping:
1 1/2 c. flour
3/4 c. sugar
1 c. brown sugar
1/2 t. salt
1 c. oatmeal, quick or old fashioned
1/2 lb. butter, diced (You WON'T regret it...)

Mix apples with orange & lemon juice, sugar, cinnamon and nutmeg in a bowl and set aside.

In bowl of mixer place all ingredients for topping and combine until it has a coarse sandy texture.

Pour apples into a 9x13 inch pan and gently cover with topping.

Bake at 350 degrees for 1 hour. Serve with whipping cream or enjoy it au natural.

Bon Appetit!

Sunday, May 2, 2010

Ina's Best Savory Cornbread

I LOVE INA GARTEN!
With that being said, here is one of my favorite recipes from Ina.
After a brief discussion - Jodie and I came to a unanimous decision.
Her previous cornbread post will remain "the best"
SWEET cornbread and this post will go down as
"the best" SAVORY cornbread.
We are looking out for you and every occasion
that might come up in your busy lives!

Ina's Savory Cornbread:

3 c. flour
1 c. yellow corn meal
1/4 c. sugar
2 T. baking powder
2 1/2 t. salt
2 c. milk
3 eggs, beaten
1 c. butter - please no substitutes
8 oz. sharp cheddar cheese, grated (more if you like)
1/3 c. chopped green onions, approx. 5 onions
3 T. jalapenos, seeded and minced

In a mixing bowl combine the dry ingredients, flour, corn meal, sugar, baking powder and salt. Add milk, eggs and melted butter. Without over mixing combine the ingredients. Gently fold in cheese, onions and jalapenos.
Let the batter sit for 20 minutes and then spread into a greased 9x13 inch pan. Bake at 350 degrees for 30-40 minutes or until a toothpick inserted into the center comes out clean.

***This is the actual recipe. I never seed the jalapenos and use 2 jalapenos, but we like to be able to taste the peppers.***

Saturday, May 1, 2010

Hot Fudge Pudding Cake

I might be the only one who has never made a pudding cake...
BUT in case I'm not, I'll share the experience with you.
The whole idea of pouring 1 cup of boiling water over a
lovely chocolate batter seemed like dessert suicide -
but as I learned a short 45 minutes later...it was just the
beginning of something rich and YUMMY.
*********
Spread batter into the corners
Sprinkle the sugar/cocoa mixture over the batter
Against my better judgement...pour boiling water over batter
Bake until the top cracks
Spoon out of pan and serve with whipping cream or ice cream

Hot Fudge Pudding Cake:
1 c. sugar, divided
1/2 c. cocoa, divided
1 c. flour
2 t. baking powder
1/4 t. salt
1/2 c. milk
4 T. butter, melted
1 egg yolk
2 t. vanilla extract
1/2 c. chocolate chips
1 c. boiling water
Heat oven to 350. Spray 8x8 inch pan with cooking spray. In a small bowl combine 1/2 c. sugar and 1/4 c. cocoa. Set aside.
In the bowl of your mixer combine flour, 1/2 c. sugar, 1/4 c. cocoa, baking powder and salt. Stir. Add milk, butter, egg yolk and vanilla and mix until well combined. Stir in chocolate chips. Batter will be stiff.
Spoon batter into prepared pan, spreading to the corners. Sprinkle reserved sugar/cocoa mixture evenly over the batter. Gently pour boiling water over the top - DO NOT STIR.
Bake for 24-28 minutes or until toothpick inserted in the center comes out with moist crumbs and the top is cracked.
Cool 10 minutes. Serve warm with whipped topping or ice cream.
Bon Appetit!